The Art of Espresso Milk Steaming for Latte Art
Learn how to perfectly steam milk for lattes and cappuccinos. Achieve silky microfoam for beautiful latte art designs.
The Art of Espresso Milk Steaming for Latte Art
Learn how to perfectly steam milk for lattes and cappuccinos. Achieve silky microfoam for beautiful latte art designs.Hey there, fellow coffee lovers! If you've ever gazed longingly at those stunning latte art creations from your favorite cafe, you're in the right place. Mastering milk steaming is arguably one of the most rewarding skills for any home barista. It's not just about making pretty pictures; perfectly steamed milk transforms your espresso into a creamy, velvety dream. We're talking about that sweet, integrated texture that makes a latte or cappuccino truly sing. Forget bubbly, thin milk or thick, unpourable foam. We're aiming for silky, glossy microfoam that flows like wet paint.
This guide is going to break down everything you need to know, from the science behind it to practical tips and even some gear recommendations. So, grab your espresso machine, your milk pitcher, and let's get steaming!
Understanding Milk Steaming The Science of Microfoam
Before we dive into the 'how,' let's quickly touch on the 'why.' Milk steaming is a delicate balance of aeration and heating. When you introduce steam into cold milk, two main things happen:
- Aeration: This is where you incorporate air into the milk, creating tiny, uniform bubbles. These tiny bubbles are what give microfoam its velvety texture. Too much air, and you get big, frothy bubbles. Too little, and your milk will be flat.
- Heating: As the milk heats up, the proteins and fats in the milk undergo changes. The proteins denature and stabilize the air bubbles, while the fats contribute to the creamy mouthfeel. Heating milk also brings out its natural sweetness through the breakdown of lactose.
The goal is to create a vortex that continuously folds the aerated milk back into the liquid, breaking down larger bubbles and integrating the air evenly. This process is what creates that desirable 'wet paint' consistency.
Essential Tools for Perfect Milk Steaming Home Barista Gear
You don't need a commercial setup to achieve great results at home, but having the right tools certainly helps. Here's what you'll need:
Stainless Steel Milk Pitcher Size and Spout Matters
This is your primary tool. Stainless steel is preferred because it conducts heat well, allowing you to feel the temperature of the milk as you steam. The size matters – you want a pitcher that's large enough to accommodate the milk expanding (it will almost double in volume) but not so large that your steam wand can't properly submerge and create a vortex. For a single latte, a 12oz (350ml) pitcher is usually perfect. For two drinks, a 20oz (600ml) pitcher is ideal.
The spout design is also crucial for latte art. Look for a pitcher with a sharp, defined spout. This allows for precise pouring and intricate designs. Some popular brands known for their quality pitchers include:
- BaristaSPACE Milk Pitcher: Highly regarded by professionals for its ergonomic handle and precise spout. Available in various sizes. (Approx. $25-40)
- Motif Latte Art Pitcher: Another excellent choice, often praised for its comfortable grip and consistent pour. (Approx. $20-35)
- Rattleware Latte Art Pitcher: A classic, reliable option that's durable and performs well. (Approx. $18-30)
Espresso Machine with a Good Steam Wand Power and Control
Your espresso machine's steam wand is the engine of your milk steaming. Look for a machine with a powerful steam wand that can produce consistent, dry steam. Machines with multiple holes in the steam tip (e.g., 3 or 4 holes) often provide more power and make it easier to create a strong vortex. Single-hole tips can work, but they require more patience and technique.
Here are some home espresso machines known for their excellent steaming capabilities:
- Breville Barista Express Impress: This all-in-one machine offers a powerful steam wand that heats up quickly and produces good pressure. It's a fantastic entry point for serious home baristas. (Approx. $800-900)
- Gaggia Classic Pro: A beloved classic for its robust steam power, especially after a simple modification (like a Rancilio Silvia steam wand tip). It's a workhorse. (Approx. $450-550)
- Rancilio Silvia: Known for its commercial-grade steam wand, the Silvia is a powerhouse for milk steaming. It takes a bit longer to heat up for steam, but the results are worth it. (Approx. $800-900)
- ECM Puristika: For those looking for a more premium option, ECM machines generally have excellent steam power and build quality. The Puristika is a compact, single-boiler machine with a dedicated steam thermoblock. (Approx. $1,500-1,800)
Thermometer Optional but Helpful for Consistency
While feeling the pitcher for temperature is a common technique, a thermometer can be a great tool for consistency, especially when you're starting out. Aim for a final milk temperature between 140-150°F (60-65°C). Going much hotter will scald the milk, destroying its sweetness and texture. Anything below 130°F (55°C) might not be hot enough for optimal sweetness and stability.
You can use a clip-on thermometer or a digital instant-read thermometer. Some popular options include:
- Rhino Coffee Gear Milk Thermometer: A reliable clip-on thermometer designed for milk pitchers. (Approx. $10-15)
- ThermoPro TP19H Digital Meat Thermometer: While designed for meat, its fast response time and accuracy make it great for milk too. (Approx. $15-20)
The Milk Steaming Process Step by Step Guide
Alright, let's get to the good stuff! This is the technique that will get you that perfect microfoam.
Step 1 Prepare Your Milk and Pitcher Cold is Key
Start with fresh, cold milk. The colder the milk, the more time you have to incorporate air before it gets too hot. Fill your pitcher to just below the bottom of the spout, or about one-third full. Don't overfill, as the milk will expand.
Step 2 Purge the Steam Wand Clean and Dry Steam
Before you start, always purge your steam wand. This clears out any condensed water inside the wand, ensuring you get dry steam. Just open the steam valve for a second or two until only steam comes out.
Step 3 Position the Steam Wand The Aeration Phase
Submerge the steam wand tip just below the surface of the milk, slightly off-center. You want to find that 'sweet spot' where you hear a gentle, tearing sound – like paper ripping. This is the sound of air being incorporated into the milk. If you hear loud hissing or screaming, the tip is too deep. If you hear sputtering, it's too shallow. This phase is crucial for creating the initial foam.
Keep the pitcher steady and slightly angled. You're aiming to create a gentle vortex that pulls the milk around the pitcher.
Step 4 The Texturing Phase Heating and Integrating
Once you've incorporated enough air (this usually takes only a few seconds, depending on your machine's power and the amount of milk), lower the steam wand tip slightly deeper into the milk. You should no longer hear the tearing sound. Now, the goal is to create a strong vortex that swirls the milk rapidly, breaking down any larger bubbles and integrating the air evenly throughout the milk. This is where the 'wet paint' consistency develops.
Keep the steam wand submerged and the milk swirling until the pitcher becomes too hot to comfortably touch (around 140-150°F or 60-65°C). If using a thermometer, stop when it reaches your desired temperature.
Step 5 Turn Off Steam and Clean the Wand Immediate Action
As soon as you reach the desired temperature, turn off the steam. Immediately wipe down the steam wand with a damp cloth to remove any milk residue. Then, purge the steam wand again to clear out any milk that might have been sucked back into the wand. This prevents milk from drying inside the wand, which can block it and harbor bacteria.
Step 6 Swirl and Tap Prepare for Pouring
Now for the final touches! Gently swirl the milk in the pitcher. This helps to integrate any remaining bubbles and ensures a uniform texture. If you see any large bubbles on the surface, gently tap the pitcher on the counter a few times to pop them. Swirl again. Your milk should look glossy and pour like melted ice cream or wet paint.
Common Milk Steaming Mistakes and How to Fix Them Troubleshooting Tips
Don't get discouraged if your first few attempts aren't perfect. Milk steaming takes practice! Here are some common issues and how to overcome them:
Too Many Large Bubbles Foamy Milk
Problem: Your milk looks like dish soap foam, with large, unstable bubbles. Cause: You incorporated too much air, or the steam wand tip was too shallow during the aeration phase, or you didn't create a strong enough vortex to break down the bubbles. Solution: Reduce the amount of air you incorporate. Aim for a shorter aeration phase (just a few seconds). Ensure the steam wand tip is just below the surface, creating that gentle tearing sound, not a loud hiss. Once aerated, submerge the tip deeper and focus on creating a strong, continuous vortex to integrate the air.
Flat Milk No Foam
Problem: Your milk is hot but has little to no foam or texture. Cause: You didn't incorporate enough air, or the steam wand tip was too deep from the start. Solution: Ensure the steam wand tip is just at the surface of the milk during the initial aeration phase. You need to hear that tearing sound to introduce air. Don't submerge it too quickly.
Scalded Milk Burnt Taste
Problem: Your milk tastes burnt or has an unpleasant, cooked flavor. Cause: You heated the milk too hot. Solution: Stop steaming when the pitcher is too hot to comfortably touch, or when your thermometer reaches 140-150°F (60-65°C). Overheating destroys the milk's natural sweetness and can make it taste bitter.
Milk Not Swirling Properly No Vortex
Problem: The milk isn't circulating in the pitcher, leading to uneven texture. Cause: Incorrect steam wand position or angle, or insufficient steam power. Solution: Ensure the steam wand tip is slightly off-center and angled towards the side of the pitcher. This helps create the swirling motion. If your machine has low steam power, you might need to adjust your technique to compensate, perhaps by tilting the pitcher more aggressively.
Choosing the Right Milk for Latte Art Dairy and Non Dairy Options
While technique is paramount, the type of milk you use also plays a significant role in the quality of your microfoam.
Dairy Milk Whole Milk is King
Whole Milk: This is generally considered the best for latte art. Its higher fat content contributes to a richer, creamier texture, and its protein content helps stabilize the foam. It's easier to work with and produces the most consistent results.
Low-Fat/Skim Milk: While you can steam these, they are more challenging. They produce larger, less stable bubbles and a thinner texture due to lower fat content. The sweetness will also be less pronounced.
Non-Dairy Milk The Plant Based Challenge
Steaming non-dairy milk can be a bit trickier, as their protein and fat structures differ from dairy milk. However, many brands now offer 'barista blend' or 'barista edition' versions specifically formulated for coffee, which steam much better.
- Oat Milk: Often considered the best non-dairy option for latte art. Barista blends of oat milk (like Oatly Barista Edition, Minor Figures, or Califia Farms Barista Blend) steam beautifully, producing a creamy, stable microfoam with a pleasant sweetness. (Approx. $4-6 per carton)
- Soy Milk: Another good option, especially barista blends. It can be a bit more finicky and prone to splitting or curdling if overheated, but it can produce decent foam. (Approx. $3-5 per carton)
- Almond Milk: Generally more challenging to steam due to lower protein and fat content. It often produces thinner, less stable foam. Look for barista blends if you prefer almond milk. (Approx. $3-5 per carton)
- Coconut Milk: Can be very difficult to steam for latte art. It tends to separate and produce large, unstable bubbles. Not recommended for serious latte art practice.
Pro Tip for Non-Dairy: Always use the coldest non-dairy milk possible. Some non-dairy milks are more sensitive to heat, so be extra careful not to overheat them.
Practice Makes Perfect Consistency and Patience
Like any skill, mastering milk steaming takes practice. Don't get discouraged if your first few attempts aren't perfect. Focus on consistency:
- Listen to the Sounds: Pay attention to the tearing sound during aeration and the silent swirling during texturing.
- Feel the Temperature: Learn to gauge the milk temperature by hand.
- Observe the Texture: Look for that glossy, wet paint consistency.
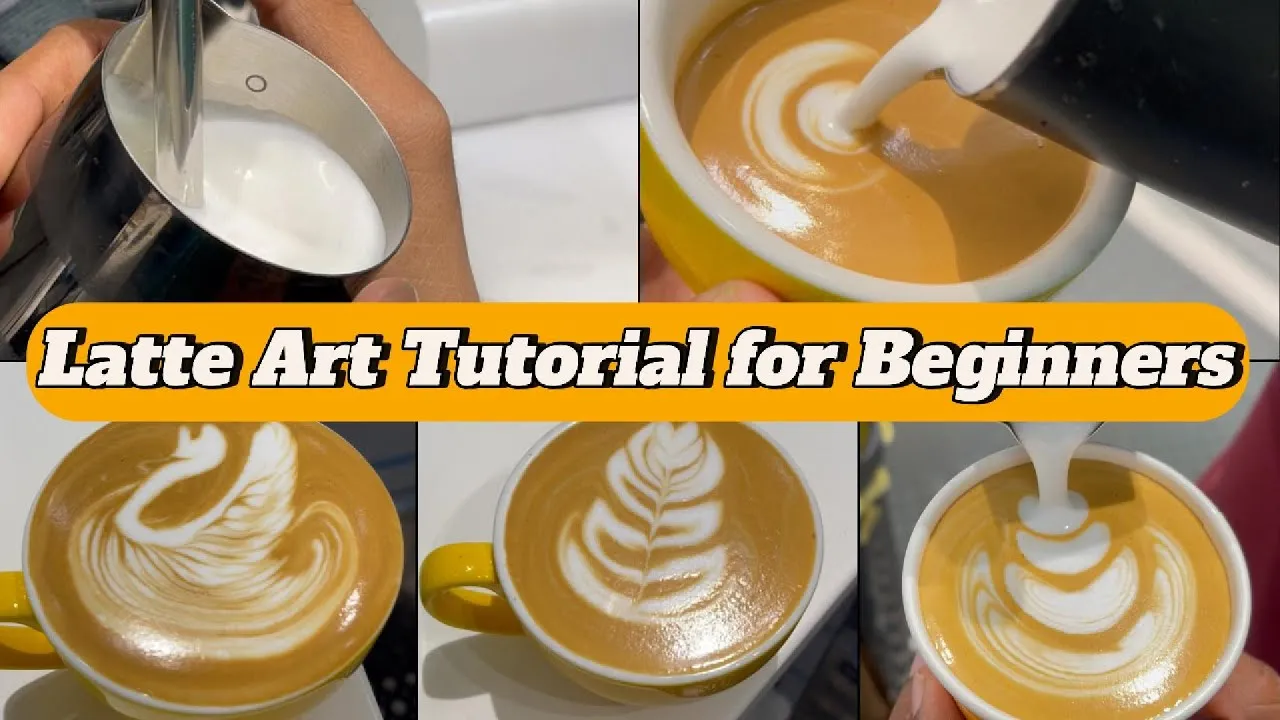
- Practice Pouring: Once you have good milk, practice your pouring technique for latte art. Start with simple hearts and move on to more complex designs.
Many baristas recommend practicing with water and a tiny drop of dish soap. This allows you to practice the aeration and vortex creation without wasting milk. While it won't perfectly replicate milk, it's a great way to get a feel for the steam wand and pitcher movements.
So, there you have it! With the right tools, a solid understanding of the process, and plenty of practice, you'll be steaming silky microfoam and pouring beautiful latte art in no time. Enjoy your delicious, homemade coffee creations!
:max_bytes(150000):strip_icc()/277019-baked-pork-chops-with-cream-of-mushroom-soup-DDMFS-beauty-4x3-BG-7505-5762b731cf30447d9cbbbbbf387beafa.jpg)